Setting up a full Erigon Ethereum node on AWS - Part 1/4 Terraforming AWS

If you're looking for a step by step guide on how to setup a full Ethereum node and get it ready for the merge, then you came to the right place. We will be deploying this on AWS using Terraform and Ansible, but the same setup (minus Terraforming) was tested on bare-metal hardware.
You will need an AWS account for this and aws-cli configured with programmatic access credentials, Terraform (I'm running v1.2.5 for this) and Ansible (I'm running v2.13.1)
Github Repo
If you would like to skip straight to the code (I know I would), here's a link to the full project: https://github.com/tzumby/erigon_terraform_ansible. I didn't write this as a fork-able and runnable as-is project, so you might have to rename a few things in there (ie. add your own username and public key).
You'll also need the Grafana Dashboard JSON file: https://gist.github.com/tzumby/46561917c225843e1e1e34b356158085.
Table of contents
- Terraforming AWS (this guide)
- Linux Security hardening with Ansible
- Erigon and RPC Daemon
- Metrics and monitoring with Prometheus and Grafana
1 - Terraforming AWS
Before we dive into this, let me briefly explain why the complicated setup. Why can't we just spin EC2 instances, configure Security Groups and firewall on the servers and be done with it ? While that would certainly work just fine, it wouldn't be the most secure setup. We need to ensure that we lock down access to resources as much as possible and isolate instances that don't need to be accessed from the outside of our secure private network (more on VPCs below). This is not just because we're dealing with blockchain technology (this stuff tends to work like a honeypot for attackers), but it's also highly recommended in any type of setup.
This is not meant to teach you AWS architecture but function more like a follow-along guide. If you need to understand any of the features described below, please follow up with AWS docs on your own (otherwise this will turn into a book 🙃).
VPCs
VPC stands for Virtual Private Cloud and just like a Virtual Private Network (VPN), it allows you to run an isolated network just like you would in a private datacenter. All AWS accounts come with a default VPC, but for the most part, unless you specifically look, you won't even know it's there.
Why would you want a VPC ? There are many reasons. For starters, depending on how large your infrastructure is, you can have better control of your IP blocks via sub-nets, you can fine tune how your traffic is routed inside your VPC and control which servers are allowed to communicate or not.
Below you'll find a diagram that encompasses some of the tools available in a VPC. If you're coming from a networking background, those should seem familiar, as they try to replicate physical hardware.
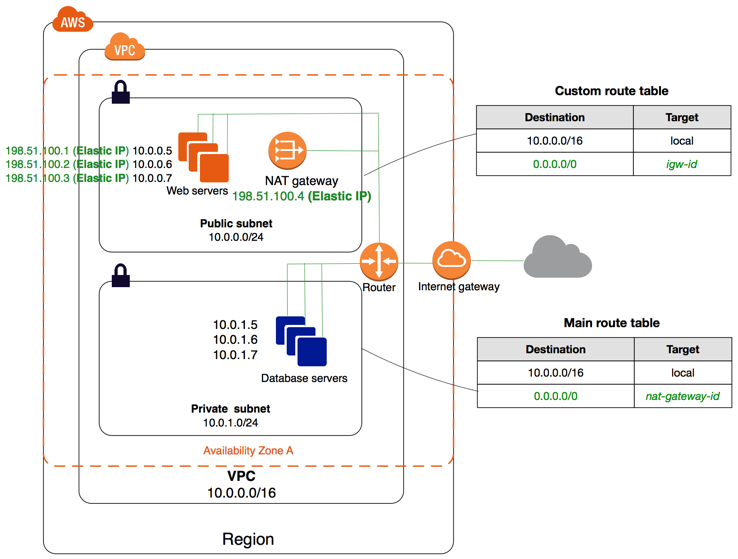
As you can see, the VPC above defines a 10.0.0.0/16 network. The /16 at the end denotes a CIDR block or put simply, how many possible IP addresses we want to VPC network to be able to handle. In our case we can have addresses from 10.0.0.0 to 10.0.255.255, or 65,025 IPs.
We are also splitting this main CIDR block into two subnets: a private subnet on 10.0.1.0/24 (10.0.1.0 to 10.0.1.255) and a public subnet on 10.0.0.0/24 (10.0.0.0 to 10.0.0.255). This will give us 255 IPs for each of the private and public subnets.
The public subnet is accessible from the outside via a NAT gateway. A Network Address Translation gateway takes traffic coming from the internet at a public IP and figures out how to route this internally to a local IP (ie. 10.0.0.*).
As you can see for the example diagram, the database servers are in the private subnet - they don't need to be directly accessible via a public IP address. They do need to access the internet for updates or downloading packages and that is going through an Internet Gateway. the IG is a combination of a Router and NAT gateway.
Our specific setup
Using the VPC as a starting point, we will deploy a total of 3 instances in AWS:
- SSH Bastion
- Erigon node
- Metrics
The SSH Bastion sits in the public subnet and is the only box with a publicly accessible SSH port. The Metrics server will run Grafana and Prometheus and collect metrics from the Erigon node. Both the Erigon node and the Metrics server don't need to have SSH accessible from the outside, so in order to connect to either of them, we will first have to jump through the SSH bastion (hence the name).
Below are the ports we need to filter for the erigon node:
| From | To | Protocol | CIDR Blocks | Direction | Notes |
|---|---|---|---|---|---|
| 8545 | 8545 | tcp & udp | 0.0.0.0/0 | in | JSON-RPC port |
| 42069 | 42069 | tcp & udp | 0.0.0.0/0 | in & out | Snap sync (Bittorrent) |
| 30303 | 30303 | tcp & udp | 0.0.0.0/0 | in & out | eth/66 or 67 peering |
| 6060 | 6060 | tcp | 10.0.0.0/24. | in | metrics server hits this port to collect data |
| 80 | 80 | tcp | 0.0.0.0/0 | out | apt needs to access the internet |
| 443 | 443 | tcp | 0.0.0.0/0 | out | apt needs to access the internet |
Terraforming
We start by configuring our provider and defining our VPC CIDR block.
provider "aws" {
  region = "us-east-1"
  profile = "default"
  shared_credentials_files = ["~/.aws/credentials"]
  shared_config_files = ["~/.aws/config"]
}

resource "aws_vpc" "main" {
  cidr_block = "10.0.0.0/16"

  tags = {
    Name = "ethereum-infrastructure"
  }
}Our Internet Gateway, along with the Elastic IP attached to it.
resource "aws_internet_gateway" "gw" {
  vpc_id = "${aws_vpc.main.id}"

  tags = {
    Name = "main"
  }
}

resource "aws_nat_gateway" "nat" {
  allocation_id = "${aws_eip.gw_ip.id}"
  subnet_id = "${aws_subnet.public.id}"
  depends_on = [aws_internet_gateway.gw]
}Note that we have 3 elastic IPs: one of the IG, another one for the SSH bastion and a third one for the metrics service, which we will need to access to load up the Grafana Dashboards.
resource "aws_eip" "gw_ip" {
  vpc = true
  depends_on = [aws_internet_gateway.gw]
}

resource "aws_eip" "bastion_ip" {
  vpc = true
  instance = aws_instance.ssh_bastion.id
}

resource "aws_eip" "metrics_ip" {
  vpc = true
  instance = aws_instance.metrics_node.id
}Next we declare our route tables and subnets
resource "aws_route_table" "public" {
  vpc_id = "${aws_vpc.main.id}"

  route {
    cidr_block = "0.0.0.0/0"
    gateway_id = "${aws_internet_gateway.gw.id}"
  }

  tags = {
    Name = "public"
  }
}

resource "aws_route_table" "private" {
  vpc_id = "${aws_vpc.main.id}"

  route {
    cidr_block = "0.0.0.0/0"
    nat_gateway_id = "${aws_nat_gateway.nat.id}"
  }

  tags = {
    Name = "private"
  }
}

resource "aws_route_table_association" "public" {
  subnet_id = "${aws_subnet.public.id}"
  route_table_id = "${aws_route_table.public.id}"
}

resource "aws_route_table_association" "private" {
  subnet_id = "${aws_subnet.private.id}"
  route_table_id = "${aws_route_table.private.id}"
}Subnets
resource "aws_subnet" "public" {
  vpc_id = "${aws_vpc.main.id}"
  cidr_block = "10.0.0.0/24"
  availability_zone = "us-east-1b"

  tags = {
    Name = "Public"
  }
}

resource "aws_subnet" "private" {
  vpc_id = "${aws_vpc.main.id}"
  cidr_block = "10.0.1.0/24"
  availability_zone = "us-east-1b"

  tags = {
    Name = "Private"
  }
}And finally, we declare our instances:
resource "aws_instance" "ssh_bastion" {
  ami           = "ami-052efd3df9dad4825"
  instance_type = "t2.micro"
  subnet_id     = "${aws_subnet.public.id}"
  key_name      = "aws_cert"

  associate_public_ip_address = true

  vpc_security_group_ids = [
    "${aws_security_group.sg_ssh_bastion.id}"
  ]

  tags = {
    Name  = "ssh_bastion"
  }
}

resource "aws_instance" "erigon_node" {
  ami           = "ami-052efd3df9dad4825"
  instance_type = "t2.xlarge"
  subnet_id     = "${aws_subnet.public.id}"
  key_name      = "aws_cert"

  associate_public_ip_address = true

  vpc_security_group_ids = [
    "${aws_security_group.sg_erigon_node.id}"
  ]

  tags = {
    Name  = "erigon_node"
  }

  ebs_block_device {
    device_name = "/dev/sdg"
    volume_size = 1000
    volume_type = "gp2"
  }
}

resource "aws_instance" "metrics_node" {
  ami           = "ami-052efd3df9dad4825"
  instance_type = "t2.micro"
  subnet_id     = "${aws_subnet.public.id}"
  key_name      = "aws_cert"

  associate_public_ip_address = true

  vpc_security_group_ids = [
    "${aws_security_group.sg_metrics_node.id}"
  ]

  tags = {
    Name  = "metrics_node"
  }

  root_block_device {
    volume_size = 30
  }
}I picked a t2.xlarge with 1TB EBS volume for the Erigon node. This is the bare minimum for a full node with pruning enabled. Because the EBS volume is not directly attached, the sync-ing time for this node will take a little longer than usual.
Creating the servers
$ terraform plan && terraform applyAfter running the resources are created, here are the IPs that got assigned for me (you will have different IPs both public and internal):
| Server | IP Address |
|---|---|
| SSH Bastion | 3.xxx.xxx.xxx |
| Erigon | 10.0.0.84 |
| Metrics | 10.0.0.117 |
SSH Access
Now that we have this setup, we'll need to configure our SSH agent to jump through the SSH bastion when accessing our instances. We could make this even more secure by using a VPN only connection to our SSH bastion, but for the purpose of this guide, we'll have the bastion server open to the internet and listening on port 22.
Below is my ssh agent configuration that uses ProxyCommand to jump through the publicly available bastion server and access the private network boxes (running the Erigon node and the metrics server)
# ssh bastion
Host 3.xxx.xxx.xxx
  User ubuntu
  IdentityFile ~/.ssh/aws_cert.cer

# erigon
Host 10.0.0.84
  User ubuntu
  Hostname 10.0.0.84
  Port 22
  IdentityFile ~/.ssh/aws_cert.cer
  ProxyCommand ssh -A -q -W %h:%p 3.xxx.xxx.xxx

# metrics
Host 10.0.0.117
  User ubuntu
  Hostname 10.0.0.117
  Port 22
  IdentityFile ~/.ssh/aws_cert.cer
ProxyCommand ssh -A -q -W %h:%p 3.xxx.xxx.xxxUsing this configuration, I can login into my erigon node as if it was in my local area network:
ssh 10.0.0.84Continue
Part 2 of this series is out.
Member discussion